Simple, DIY Hair Tie & Bracelet Organizer
Simple, DIY Hair Tie & Bracelet Organizer
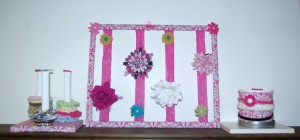
This hair tie & bracelet organizer is created from items found around the house and can be used for a multitude of things including Hair Ties and Bracelets.
It, of course, coordinates with the Hair Bow Holder and Headband Organizer we shared previously.
Supplies:
Dowels- We used an old 1 inch closet rod, a broken broom handle and even paper towel holders in a pinch. (We had several girls for a “makeover” night and wanted things easily accessible so we compromised with paper towel holders. Yes, I.am.a.neat.freak.)
Paint and Brush- We prefer Delta Ceramcoat Acrylic Craft Paint.
Tip: Use your 40% coupon and purchase it for less an $1.00/2 0z bottle at Hobby Lobby. Michael’s in our area no longer carries Ceramcoat, much to my dismay.
Board- We used a 1 inch thick scrap board measuring 7″x 9″. Your board will need to work with the number and size of dowels you will be using and the space you wish to store it in.
Material 2 inches wider than the board
Scissors
Hot Glue and Gun
1 to 2 Screws Per Dowel being used
4 Screws that are deeper than the 1 inch board if you are mounting it to the wall. (We leave ours on a shelf.)
Hair Tie & Bracelet Organizer Instructions
1.) Begin by painting the dowels. These will need at least 2 coats. (You can work on other assembly items between coats.)
2.) Mark & insert the screws into the reverse side of the wood. Remove screws. (This makes it much easier to attach dowels after material is attached.)
3.) Apply material to the wooden square by centering the cloth and applying glue to the center of the board. Apply glue then press down, smoothing and tightening material as you work from the center moving outward.
4.) Once the flat surface is completed begin gluing the edges down- one edge at a time, pulling tightly as you go. Fold corners along edges as though you are wrapping a gift. Glue, tighten and secure. (See Photo)
5.) Secure remaining edges to the back.
6.) Insert screws into pre-existing holes and attach dowels. Screwing from back to front.
7.) Touch up any damaged paint. Add hair ties, bracelets, etc…
Check out our other DIY recycled hair supply organizers
Please feel free to share your completed projects, we would love to see what you have made.
Feel free to follow us and share this post on the social media platform of your choice.
For more great zero/low budget DIY ideas you can follow us on Pinterest, Facebook, Instagram and sign up for weekly emails.
As always feel free to leave comments and additional tips below; we LOVE hearing from you.
Have a blog with your own great hair organization ideas?
Be sure to share them in our weekly Sharing Saturday Link Up Series.
This post contains affiliates links.
2 Comments
Other Links to this Post
-
Treasured Tidbits by Tina Simple DIY Hair/Earring Organizer - Treasured Tidbits by Tina — July 21, 2016 @ 10:02 am
-
Treasured Tidbits by Tina 15 Simple Ways to Organize Your Hair Accessories - Treasured Tidbits by Tina — October 15, 2016 @ 1:09 am
RSS feed for comments on this post. TrackBack URI


